Categories:
Nginx容器体验(包含生成 HTTPS 证书的过程)
Docker 真的是好东西,搭建 CSAPP 的实验环境都不需要虚拟机。
推荐文章
Nginx 容器教程 - 阮一峰的网络日志 (ruanyifeng.com)
铺垫
我承认我比较菜,连端口的作用都不知道。
就是端口可以将信息发送到正确的进程上。本质上 http 服务就是一个进程。
比如 80 端口就是 http 协议的默认端口,如果需要访问一个网站的正确方式是
http://github.com:80
如果是 https 协议,那么默认端口就是 443
https://github.com:443
实际上这些默认端口都可以改的。
如果需要连上容器内的 http 服务,就需要将本机的端口映射到容器的端口上。
一般情况下
docker run \
  -dit \
  -p localhost:80:80 \
  --rm \
  --name mynginx \
  nginx
但是如果本机的 80 端口被占用,就需要改成其他。
docker run \
	--rm \
	--name web \
	-dit \
	-p 8080:80 \
	--volume "$PWD/html":/usr/share/nginx/html \
  --volume "$PWD/conf":/etc/nginx \
	nginx:alpine
这是为了把本机当前目录的 html 和 conf 映射到 容器的 Nginx 网页文件和配置目录上。
这种举措能够实现持久化(除非你把容器保存下来)
Apache 服务器
如果是从源码开始编译的话,一开始会有点麻烦。
首先需要找到 httpd.conf ,可以看 https://httpd.apache.org/docs/current/programs/configure.html
发现 --sysconfdir=DIR 这个 option 是用来指定配置文件的。
如果没有设置,那么就是 PREFIX/conf (就安装目录下的 conf 文件夹)
在这个文件下找到 DocumentRoot ,就知道我们应该把 HTML 放到哪里了。
但你也可以改掉,比如我的目录就是
DocumentRoot "/tests/apache/opt/htdocs"
需要注意的是,Docker 容器本身就是为进程服务的,这不像 Linux OS 。
要保持容器持续运行,需要至少一个主要的程序处于前台工作的状态 (比如常见 CMD/ENTRYPOINT /bin/bash 或者 deamon 运行 MySQL)。可以试一下只运行以下指令,容器会马上退出。这是因为 apachectl 的工作完成以后,容器就没有可以依赖的进程了,自然就没有继续存在的理由。
apachectl start
由于我把程序写到本机上,然而 docker 默认先进入 Entrypoint ,再加载数据卷。这就无解了。
只能进入容器后再搞 (不知道用mount 能不能避免这种行为)
docker run \
	--name web_server \
  -it \
	--rm \
  --expose 80 \
  -p 3000:80  \
  --volume "$PWD/tests/apache/opt":/tests/apache/opt \
  --entrypoint "/bin/bash"
  "镜像名字"
(因为刚开始 build 镜像的时候没想过拿来做 httpd ,忘了暴露端口)。
/tests/apache/opt/bin/apachectl -D FOREGROUND
输入 http://127.0.0.1:3000/ 可以看到效果了!

在启动的时候,可能会遇到
httpd: Could not reliably determine the server's fully qualified domain name, using 172.17.0.2. Set the 'ServerName' directive globally to suppress this message
这是因为 httpd.conf 还没有动过,加一些 directives 就可以了 (后面 SSL 证书也需要 directives)
看 How to Setup Apache HTTP with SSL Certificate? (geekflare.com) 也有教
修改配置文件 httpd.conf 就可以 (提前知道这个在之后生成 SSL 证书能用上,OpenSSL 创建证书需要回答几个问题)。
ServerName 127.0.0.1
(不需要画蛇添足,到时候加端口就好了)。
如果启动失败
Upgrading to 2.4 from 2.2 - Apache HTTP Server Version 2.4
Invalid command 'User', perhaps misspelled or defined by a module not included in the server configuration - load module mod_unixd
载入 load module mod_unixd 。
打开 httpd.conf
LoadModule unixd_module modules/mod_unixd.so
添加到系统路径
这里假设不涉及编译过程 (编译的话需要 include, lib)
export PATH=/usr/local/openssl/bin:$PATH
export LD_LIBRARY_PATH=/usr/local/openssl/lib:$LD_LIBRARY_PATH
RSA/ECC 双证书
使用ECDSA算法的自签名https证书生成 - BEZALEL的部落格
自签名https证书生成 (附赠nginx配置文件) - BEZALEL的部落格
密钥文件的生成
openssl genrsa -des3 -out server_rsa.key 4096
openssl rsa -in server_rsa.key -out server_rsa.key
第二个指令是去掉 密码。
CSR, CA, certificate 全部用同一个 key 。
服务器证书申请文件 Certificate Signing Request (CSR)
生成的server.csr文件,是用来递交给CA让他来认证签名的。
146.179.131.210
openssl req -new -key server_rsa.key -out server_rsa.csr
You are about to be asked to enter information that will be incorporated
into your certificate request.
What you are about to enter is what is called a Distinguished Name or a DN.
There are quite a few fields but you can leave some blank
For some fields there will be a default value,
If you enter '.', the field will be left blank.
-----
Country Name (2 letter code) [AU]:AU
State or Province Name (full name) [Some-State]:VIC
Locality Name (eg, city) []:Melbourne
Organization Name (eg, company) [Internet Widgits Pty Ltd]:Randoruf
Organizational Unit Name (eg, section) []:Randoruf
Common Name (e.g. server FQDN or YOUR name) []:127.0.0.1
Email Address []:masswie@yahoo.com

Please enter the following 'extra' attributes
to be sent with your certificate request
A challenge password []:123456
An optional company name []:Randoruf
A challenge password []:123456
CA证书的生成
openssl req -new -x509 -key server_rsa.key -out ca_rsa.crt -days 365
bash-4.4# openssl req -new -x509 -key server_rsa.key -out ca_rsa.crt -days 365
You are about to be asked to enter information that will be incorporated
into your certificate request.
What you are about to enter is what is called a Distinguished Name or a DN.
There are quite a few fields but you can leave some blank
For some fields there will be a default value,
If you enter '.', the field will be left blank.
-----
Country Name (2 letter code) [AU]:AU
State or Province Name (full name) [Some-State]:VIC
Locality Name (eg, city) []:Melbourne
Organization Name (eg, company) [Internet Widgits Pty Ltd]:Randoruf
Organizational Unit Name (eg, section) []:Randoruf
Common Name (e.g. server FQDN or YOUR name) []:127.0.0.1
Email Address []:masswie@yahoo.com
为服务器签发证书
openssl x509 -req -days 365 -in server_rsa.csr -CA ca_rsa.crt -CAkey server_rsa.key -CAcreateserial -out server_rsa.crt
Signature ok
subject=C = AU, ST = VIC, L = Melbourne, O = Randoruf, OU = Randoruf, CN = 127.0.0.1, emailAddress = masswie@yahoo.com
Getting CA Private Key
至此,我们已经完成了证书的生成。我们将得到 server.key,server.csr,server.crt,ca.crt四个文件,如果你为CA单独生成个密钥, 可能还会有一个 ca.key的文件。
自签名证书
需要参考
这里需要注意,Ciphersuite 包含了密钥的加密方法,也就是证书其实是跟 ciphersuite 相关的 (因为证书里面包含了公钥)。
可能的错误:
由于 openssl 并不是安装到
/usr/local/目录,所以可能会提示Error loading shared library libssl.so.1.1: No such file or directory (needed by /tests/apache/opt/bin/openssl) Error loading shared library libcrypto.so.1.1: No such file or directory (needed by /tests/apache/opt/bin/openssl)这时候需要
LD_LIBRARY_PATH(OpenSSL 的libcrypto.so就在这个文件下)export LD_LIBRARY_PATH=$LD_LIBRARY_PATH:/tests/apache/opt/lib/为了让参数生效(重启后也生效,或者到 ` ~/.bashrc` 修改)
ldconfig
然后会弹出一堆问题,比较重要的是 Common Name ,正常情况是域名 (也就是上面 ServerName)
127.0.0.1
下一步就是让 httpd 使用 SSL 模块了 (默认是关闭的)
打开 httpd.config ,看看有没有一行是加载 SSL模块、SSL配置文件(不是 commented 状态)
LoadModule ssl_module modules/mod_ssl.so
Include conf/extra/httpd-ssl.conf
之后配置 SSL 在Apache服务器上安装SSL证书 (aliyun.com)
由于使用的自签名证书,SSLCertificateChainFile 没有太大意义。可以参考
- SSL 证书 Apache 服务器 SSL 证书安装部署-证书安装-文档中心-腾讯云-腾讯云 (tencent.com)
- 在Apache服务器上安装SSL证书 (aliyun.com)
- Cipherlist.eu - Strong Ciphers for Apache, nginx and Lighttpd
可能的错误
SSLSessionCache: 'shmcb' session cache not supported (known names: ). Maybe you need to load the appropriate socache module (mod_socache_shmcb?).需要修改
httpd.confLoadModule socache_shmcb_module modules/mod_socache_shmcb.so
此时需要重启 docker 的容器(关掉 http)
docker run \
	--name web_server \
  -it \
	--rm \
  --expose 443 \
  -p 3000:443  \
  --volume "$PWD/tests/apache/opt":/tests/apache/opt \
  --entrypoint "/bin/bash"
  "镜像名字"
再次启动 apache 服务
/tests/apache/opt/bin/apachectl -D FOREGROUND
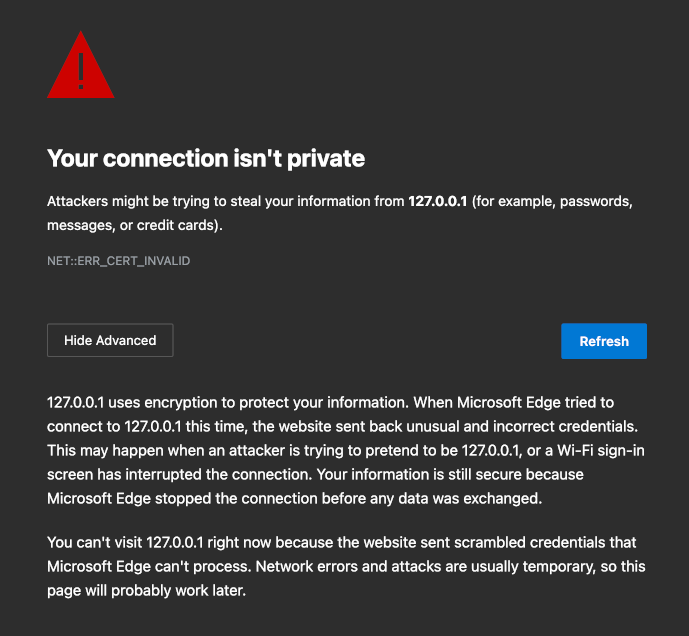
再次尝试访问 https://127.0.0.1:3000 ,会提示

甚至都不允许 Proceed ,随手查了一下 Bypass Chrome self-signed certificate not working error page - Useful Snippets (khromov.se)
- 尝试换到其他浏览器 (比如 FireFox, Safari)
- 在 URL 栏打
thisisunsafe - 安装证书 (比如 FireFox 可以单独管理证书)
Setting -> Privay & Security -> Certificates -> View Certificates
(话说试了一下, Firefox 速度真的快)
如果依旧出错,就是加密算法不匹配了
https://support.mozilla.org/dsb/questions/1260906
比如
SSL_ERROR_NO_CYPHER_OVERLAP就是 Server 那边只提供特定的加密算法。可以使用类似以下的配置只提供两种加密套件。但是有些加密套件比较弱,已经被放弃了。
所以即使安装了证书也依旧会出现
SSL_ERROR_NO_CYPHER_OVERLAPSSLCipherSuite "ECDHE-RSA-AES256-SHA:ECDHE-ECDSA-AES256-GCM-SHA384" SSLHonorCipherOrder on
SSL 加强配置
以上的配置实际上是不安全的。在生产环境还需要其他额外的设置。
- How To Create a Self-Signed SSL Certificate for Apache in Ubuntu 18.04 - DigitalOcean
- Cipherlist.eu - Strong Ciphers for Apache, nginx and Lighttpd
- Mozilla SSL Configuration Generator
有时间再去研究其他东西。